- Monaeo Personal
- Monaeo Enterprise
- Monaeo Personal
- Monaeo Enterprise
Getting Started with Monaeo Personal
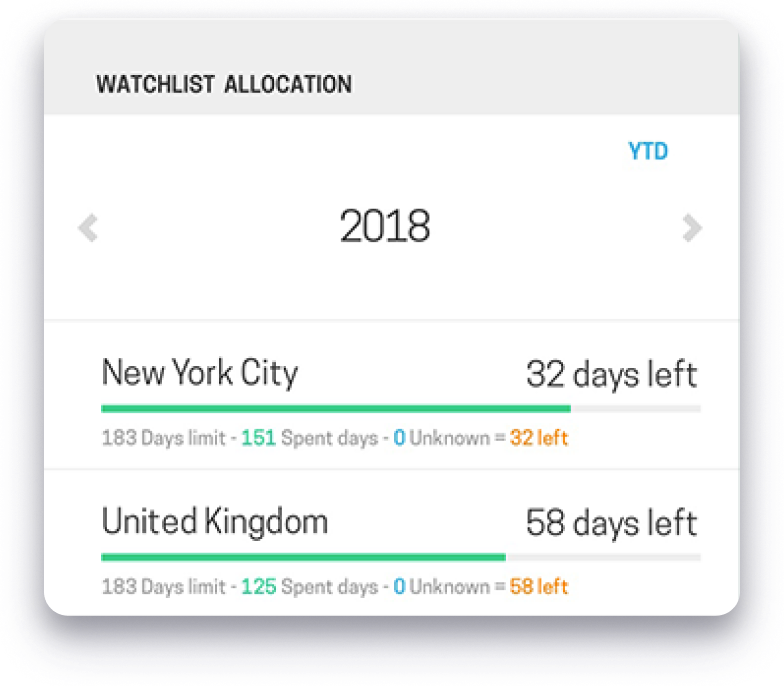
Residency Watch
Monaeo Personal shows you exactly how many days you have spent in each of your watchlist locations and how many days are left before you cross the threshold limit.
- Monaeo Personal shows the limit that has been set for each location, the number of days spent in that location, and the number of unknown days, i.e., when Monaeo was unable to determine the location.
- The formula below each location shows how the number of days left in that location is calculated.
- A red alert indicates that the limit has been crossed.
- An orange alert will tell you that you are getting close to the limit.
- To add watchlist locations, go to the Settings page on the web.
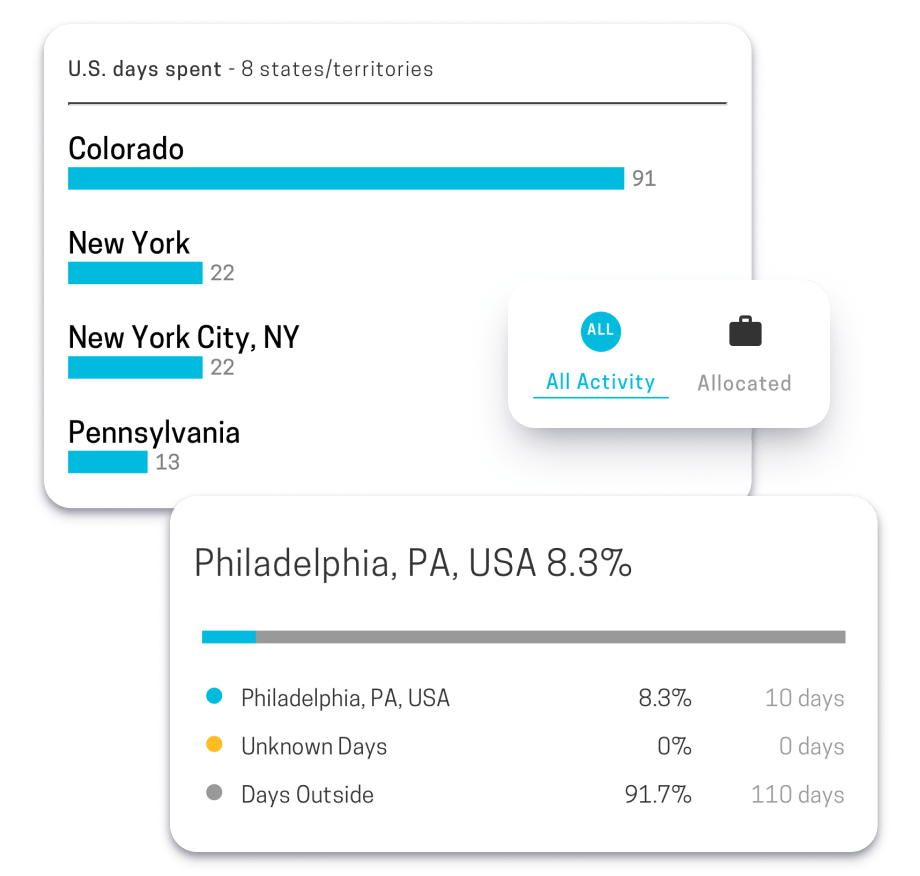
Location Overview
View your travel history across U.S. states and countries for any period and filter it to view a specific activity (such as Transit or Personal).
- By default, the “Location Overview” dashboard shows the day count from the beginning of the current year (year-to-date), but you may select a different date range.
- By default, the “Location Overview” dashboard shows days spent across all locations (countries and U.S. states) for all activities, but you may filter it for a specific activity (e.g., Personal or Transit).
- Select the “Location Details” button at the bottom of the module to view the total unique days in each location.

Calendar Editor
Residency Implication
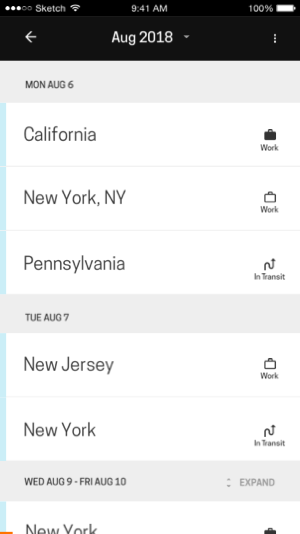
Monaeo automatically tells you the implication of being in a watchlist location for personal or work (which counts towards residency) versus a transit (which does not).
- Days that count towards residency in a location will be indicated with a small oval below the location name.
- “+1 Residency” indicates that 1 additional day is being counted towards the residency limit in that location.
- If the same location shows up multiple times on the same given day, it will count as only 1 additional residency day in that location.
- Both personal and work count towards residency.
- Transit does not count towards residency.
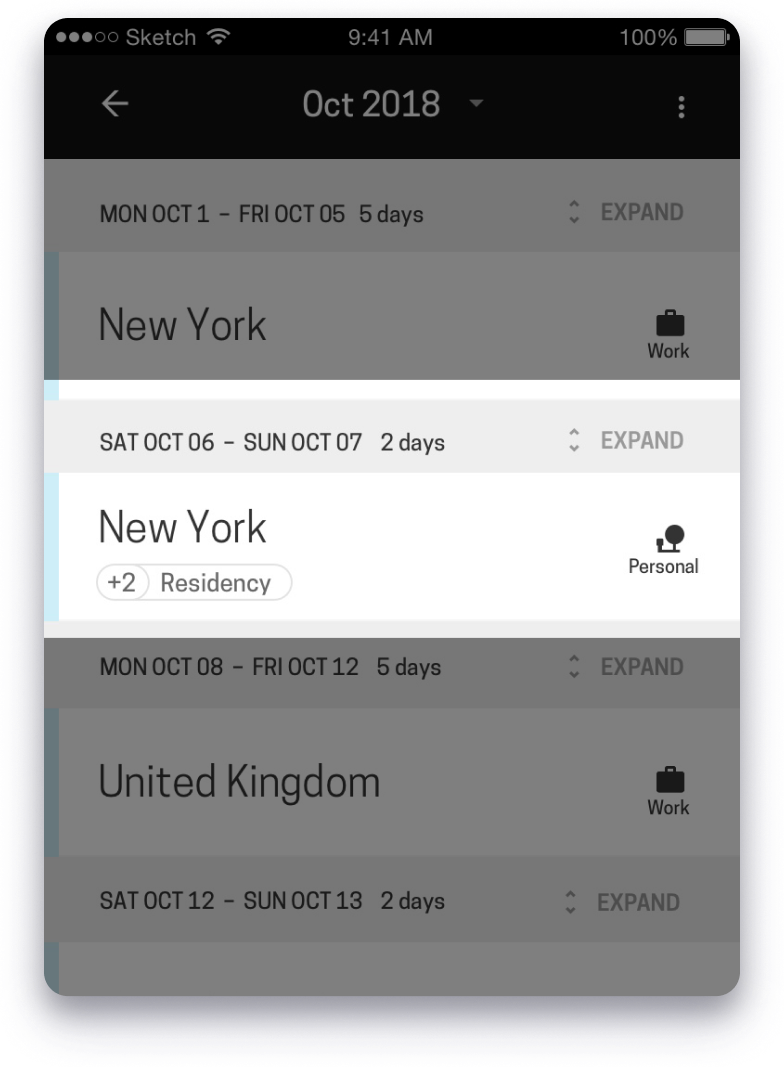
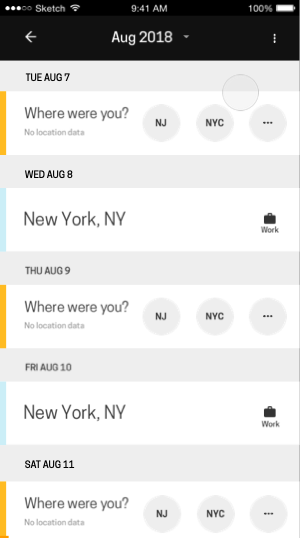
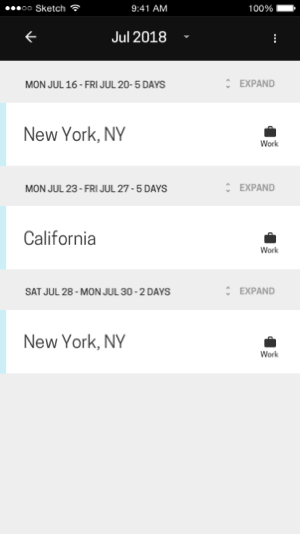
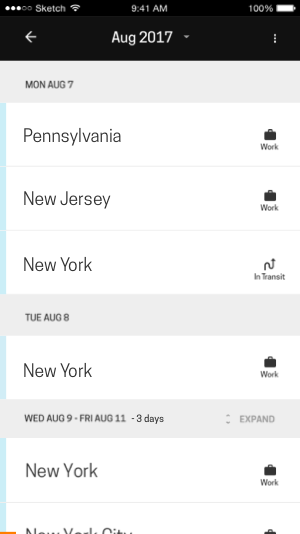
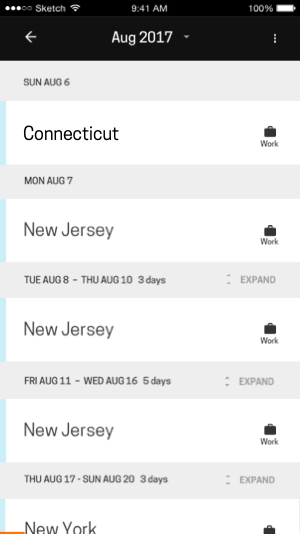
Trip Expansion
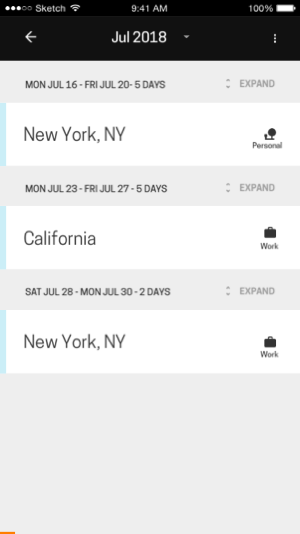
Consecutive days in a location with the same activity are grouped as a trip to make it easier to review and update.
- Trips are taller than single-day locations, so you can identify multi-day trips easily.
- Both location and activity for a trip can be edited as a group. When updated as a group, all days will be changed at the same time
- “Expand” trips to update the location or activity for individual days.
Pro-tip: You can expand all trips in a month by selecting “Expand all trips” on the top-right of the screen. You can collapse all expanded trips in a month by selecting “Collapse all trips” on the top right of the screen. On some screens, these options may be inside the three-dot menu.
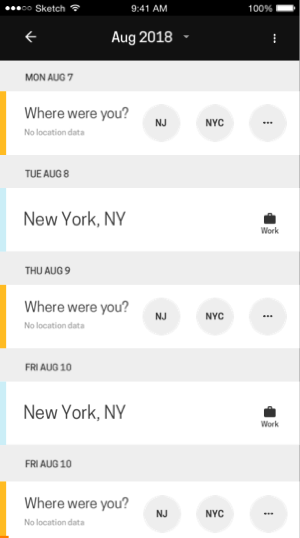
Unknown Location Assignment
To add an Unknown location, select one of the default locations presented for quick access. You may assign a location to a single day, multiple days, or an entire week at once.
- Unknown days are created because Monaeo is unable to determine your location based on the available data.
- On the Calendar, days with Unknown locations are presented in orange with the text “Where were you?”.
- Set the location to one of the default location options presented. Select “…” to choose a different location. All days on a trip will be assigned to the selected location.
- If weekends are enabled, when days are assigned for an entire week at once, weekdays will default to “Work” and weekends will default to “Personal”.
- If different days on a trip need to be assigned to different locations, “Expand” the trip and assign each day to a different location.
Pro-tip: Use multi-select to add a location across multiple days.
- On the Calendar, select “Edit Multiple” on the top right of the screen. On some screens, this option may be inside the three-dot menu.
- Select multiple Unknown locations by checking the box for the days you want to assign to a location.
- At the bottom of the screen, select from one of the default location options presented, or pick a different location from the list by selecting “…”.
- Select one of the suggested activities, or pick from the list by selecting “…”. Note that all days being updated will be assigned the selected activity (weekdays and weekends).
Activity Update
An activity may be updated for an entire trip (multiple days) all at once or for individual days.
- On the Calendar, select the activity icon on the right-hand side of the location card.
- Select the new activity. It will automatically update and take you back to the Calendar.
- If a card has multiple days, all days will be updated with the new activity selected.
- If different days on a trip need to be assigned to different activities, “Expand” the trip and assign each day to a different activity.
Pro-tip: use multi-select to update activities across multiple days.
- On the Calendar, select “Edit Multiple” on the top right of the screen. On some screens, this option may be inside the three-dot menu.
- Select multiple existing locations by checking the box for locations you want to update the activity for (you won’t be able to select Unknown locations if you are editing existing locations).
- At the bottom of the screen, select “Set activity”.
- Select one of the suggested activities, or pick a different activity from the list by selecting “…”.
Multiple Locations
Use “Add location/Trip” to add a location across multiple months, or to add multiple locations to one or more days.
- On the Calendar, select “Add Location/Trip” on the top right of the screen. On some screens, this option may be inside the three-dot menu.
- Choose a Start date, or a date range for which a location needs to be added.
- Start typing the name of the state or country and select an option from the presented list.
- Select an activity.
- Select the back arrow to save the update.
Location Archive
Use "Archive location" to remove a location captured in error because of a tower jump or because you forgot to switch off your device when flying.
- You have the option to archive a location or trip. This hides it from your calendar, but keeps any location data associated for audit purposes.
- Select a card with one or more locations. Select the “Archive trip” option at the bottom of the screen.
- You may “Unarchive trip” by selecting “Show archive”, selecting the location to be unarchived, and “Unarchive trip”.
- To archive multiple locations, select “Edit Multiple” on the top-right of the screen. Select multiple existing locations by checking the box for the locations you want to archive. At the bottom of the screen, select “Archive”.
Report Generation
Reporting is available at four different levels of detail:
- “Residency” report provides a summary of days spent in only the watchlist locations.
- “Location summary” report provides a summary of days in all visited locations.
- “Calendar” report provides a day-by-day breakdown of each location that was visited
- “Location log” report provides a record of each ping collected by Monaeo.
- You have a choice of downloading reports in PDF or spreadsheet format.
- Reports are currently available for download only on the web.
Getting Started with Monaeo Enterprise
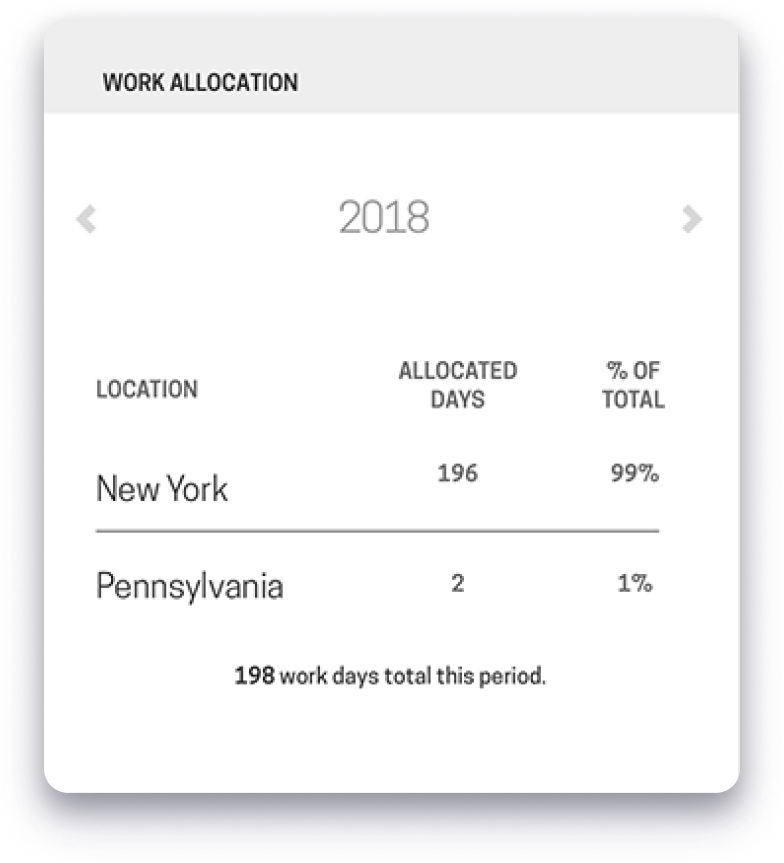
Work Allocation
Monaeo shows you the days allocated between different locations where you have crossed a threshold number of days.
- Select a location on the “Work Allocation” module of the dashboard to expand and view details of how days are allocated to that location.
- By default, the dashboard shows work days allocated from the beginning of the current year (year-to-date), but you may select a different date range.
- Only those locations where the threshold number of days (determined by your employer) have been crossed are shown on the “Work Allocation” module.
Location Overview
View your travel history across U.S. states and countries for any period and filter it to view a specific activity (such as Transit or Personal).
- By default, the “Location Overview” dashboard shows the day count from the beginning of the current year (year-to-date), but you may select a different date range.
- By default, the “Location Overview” dashboard shows days spent across all locations (countries and U.S. states) for all activities, but you may filter it for a specific activity (e.g., Personal or Transit).
- Select the “Location Details” button at the bottom of the module to view the total unique days in each location.
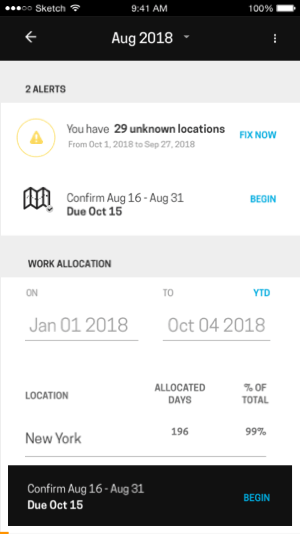
Calendar Confirmation
You may review and update the location and activity data captured by Monaeo to ensure its accuracy.
- Select “Begin” on the Dashboard or the Calendar screen on your web or mobile application. This will launch a guided tour for reviewing, updating, confirming, and submitting your data.
- Any days with an Unknown location will need to be assigned to a location before you can submit the data. Review the “Assign Unknown location” tutorial for instructions on how to do this efficiently.
- Review all locations and activities to ensure they are correct. Update locations and activities as required. Review “Update activity” and “Update locations” tutorials for instructions on how to do this efficiently.
- Important: Don’t forget to “Submit”.
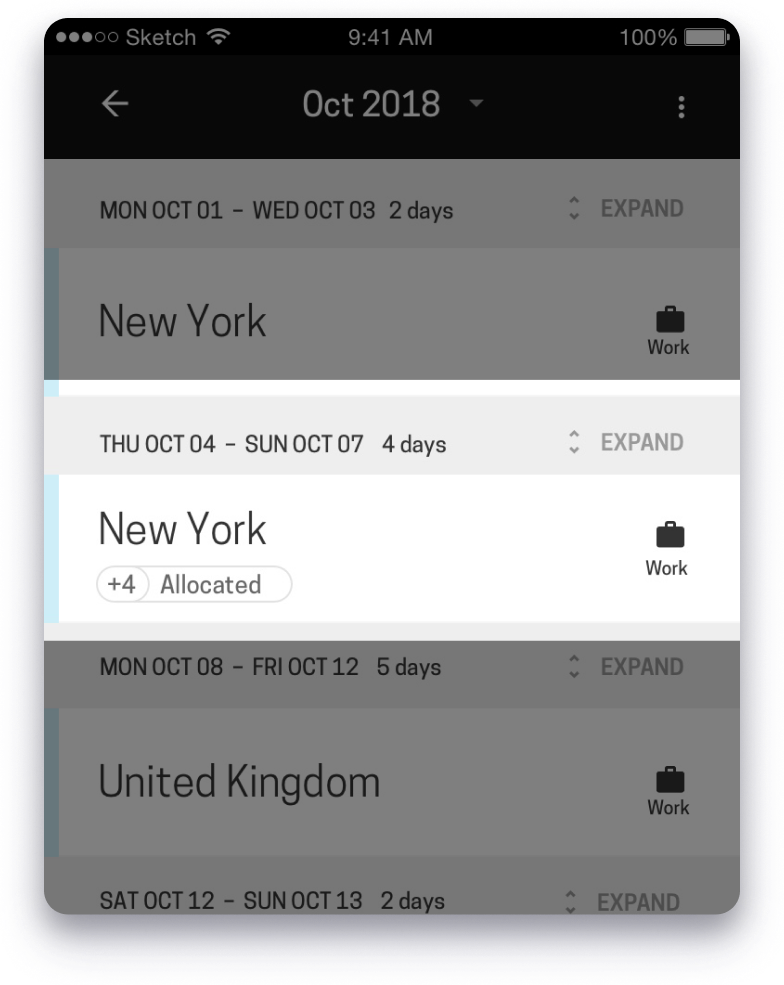
Work Allocation Implication
Monaeo automatically tells you the implication of being in a location based on the activity being performed.
- Days that count towards work allocation will be indicated with a small oval below the location name.
- ‘+1 Allocated’ indicates that 1 additional day is being counted towards work allocation in that location.
- If the same location shows up multiple times on the same day, it will count as only 1 additional day allocated to that location.
Trip Expansion
Consecutive days in a location with the same activity are grouped as a trip to make it easier to review and update.
- Trips are taller than single-day locations, so you can identify multi-day trips easily.
- Both location and activity for a trip can be edited as a group. When updated as a group, all days will be changed at the same time.
- “Expand” trips to update the location or activity for individual days.
Pro-tip: You can expand all trips in a month by selecting “Expand all trips” on the top-right of the screen. You can collapse all expanded trips in a month by selecting “Collapse all trips” on the top right of the screen. On some screens, these options may be inside the three-dot menu.
Unknown Location Assignment
To add an Unknown location, select one of the default locations presented for quick access. You may assign a location to a single day, multiple days, or an entire week at once.
- Unknown days are created because Monaeo is unable to determine your location based on the available data.
- On the Calendar, days with Unknown locations are presented in orange with the text “Where were you?”.
- Set the location to one of the default location options presented. Select “…” to choose a different location. All days on a trip will be assigned to the selected location.
- If weekends are enabled, when days are assigned for an entire week at once, weekdays will default to “Work” and weekends will default to “Personal”.
- If different days on a trip need to be assigned to different locations, “Expand” the trip and assign each day to a different location.
Pro-tip: Use multi-select to add a location across multiple days.
- On the Calendar, select “Edit Multiple” on the top right of the screen. On some screens, this option may be inside the three-dot menu.
- Select multiple Unknown locations by checking the box for the days you want to assign to a location.
- At the bottom of the screen, select from one of the default location options presented, or pick a different location from the list by selecting “…”.
- Select one of the suggested activities, or pick from the list by selecting “…”. Note that all days being updated will be assigned the selected activity (weekdays and weekends).
Activity Update
An activity may be updated for an entire trip (multiple days) all at once or for individual days.
- On the Calendar, select the activity icon on the right-hand side of the location card.
- Select the new activity. It will automatically update and take you back to the Calendar.
- If a card has multiple days, all days will be updated with the new activity selected.
- If different days on a trip need to be assigned to different activities, “Expand” the trip and assign each day to a different activity.
Pro-tip: use multi-select to update activities across multiple days.
- On the Calendar, select “Edit Multiple” on the top right of the screen. On some screens, this option may be inside the three-dot menu.
- Select multiple existing locations by checking the box for locations you want to update the activity for (you won’t be able to select Unknown locations if you are editing existing locations).
- At the bottom of the screen, select “Set activity”.
- Select one of the suggested activities, or pick a different activity from the list by selecting “…”.
Multiple Locations
Use “Add location/Trip” to add a location across multiple months, or to add multiple locations to one or more days.
- On the Calendar, select “Add Location/Trip” on the top right of the screen. On some screens, this option may be inside the three-dot menu.
- Choose a Start date, or a date range for which a location needs to be added.
- Start typing the name of the state or country and select an option from the presented list.
- Select an activity.
- Select the back arrow to save the update.
Location Archive
Use "Archive location" to remove a location captured in error because of a tower jump or because you forgot to switch off your device when flying.
- You have the option to archive a location or trip. This hides it from your calendar, but keeps any location data associated for audit purposes.
- Select a card with one or more locations. Select the “Archive trip” option at the bottom of the screen.
- You may “Unarchive trip” by selecting “Show archive”, selecting the location to be unarchived, and “Unarchive trip”.
- To archive multiple locations, select “Edit Multiple” on the top-right of the screen. Select multiple existing locations by checking the box for the locations you want to archive. At the bottom of the screen, select “Archive”.
Explore the Help
Center